Technical Tip
In Micronet 2.8, this option has been removed. You now create and print delivery manifests using the Wide Warehouse Scheduler - Manifest tab – see "Wide Warehouse Scheduler - Manifest (v2.8)".
Use this option to create a delivery manifest. A delivery manifest is a report for the courier/driver, listing all the orders (picking slips) that are to be delivered on a courier run.
You can also print the delivery manifest using this option, or you can print the manifest at a later time using the Manifest picking report in the Warehouse Scheduler (see "Picking Reports") or via Box and Courier Dockets (see "Box and Courier Dockets - Print Manifest").
|
|
|
Technical Tip In Micronet 2.8, this option has been removed. You now create and print delivery manifests using the Wide Warehouse Scheduler - Manifest tab – see "Wide Warehouse Scheduler - Manifest (v2.8)". |
To create a delivery manifest:
Refer to "Displaying the Warehouse Scheduler".
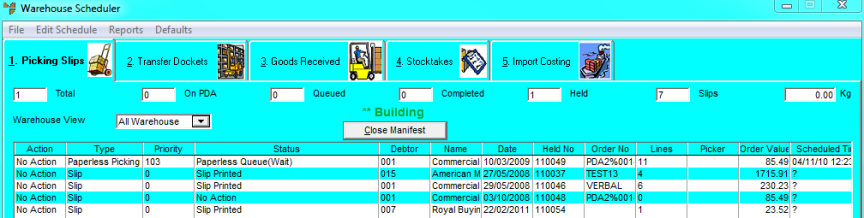
Micronet displays the Warehouse Scheduler - Picking Slips tab.
Micronet displays the text "** Building" at the top of the screen as well as a Close Manifest button.
Build Manifest
Refer to "Displaying the Warehouse Scheduler".
Micronet highlights each selected line.
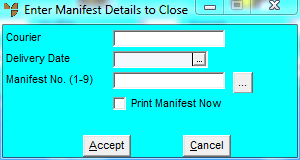
Micronet displays the Enter Manifest Details to Close screen.
|
|
Field |
Value |
|---|---|---|
|
|
Courier |
Enter the ID of the courier the manifest is for, or press Enter to select a courier. |
|
|
Delivery Date |
Enter or select a delivery date. |
|
|
Manifest No. (1-9) |
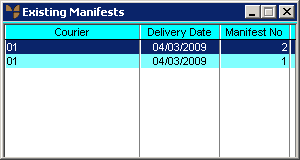
Enter the number of an existing manifest or select the browse button (...) to display all existing manifests for the selected courier and date. If you select the browse button, Micronet displays the Existing Manifests screen.
The combination of courier, delivery date and manifest number makes a unique manifest for printing purposes. Close this screen to redisplay the Enter Manifest Details to Close screen. |
|
|
Print Manifest Now |
Check this box if you want Micronet to print the manifest when you select the Accept button. Otherwise leave it unchecked. |
Micronet updates each picking slip with the manifest details.

Micronet displays the Select Output Device screen.
|
|

|
Reference For more details on these options, refer to "Selecting the Output for Inquiries and Reports". |
Micronet prints or displays the manifest and redisplays the Warehouse Scheduler.